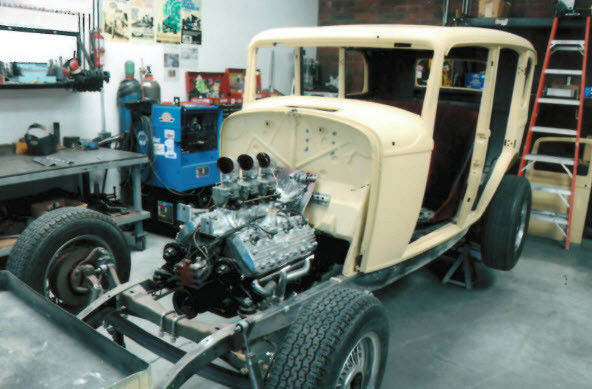
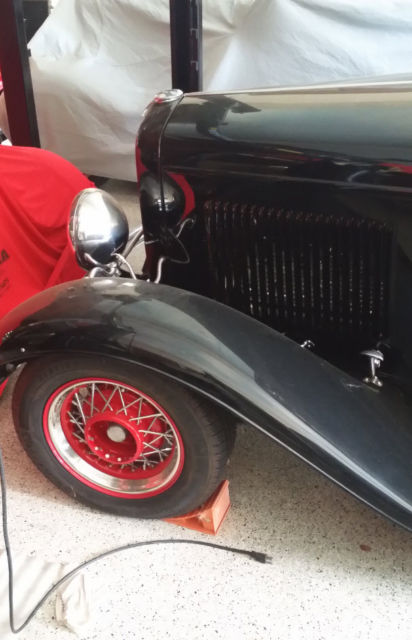
32 Ford Sedan - Greatest Barn Find Ever!
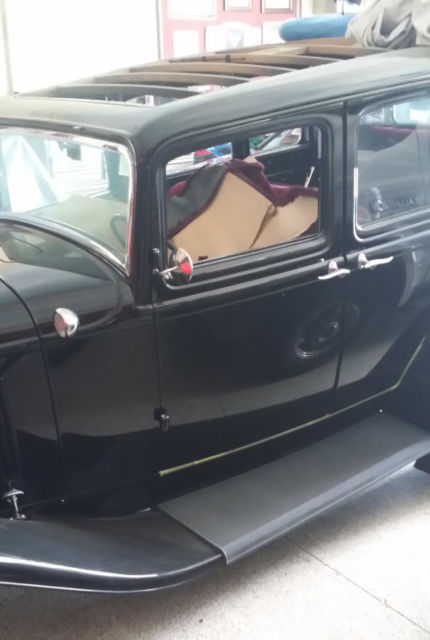

1932 Ford Sedan Black Description:
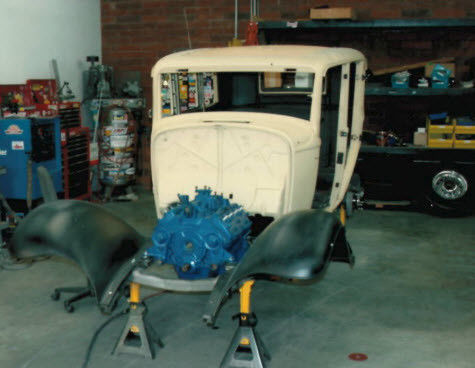
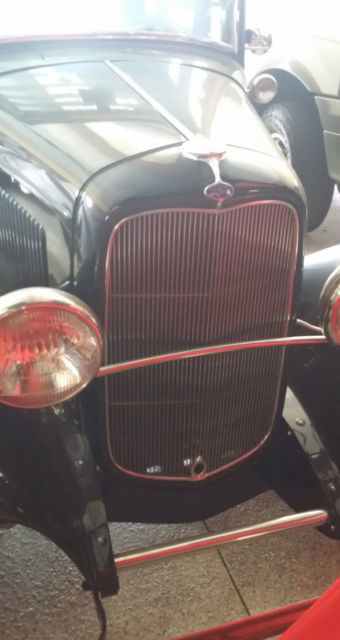
This family car was purchased by my family in 1974. Over the years the car has been painted, re-powered, loved and tinkered with by a family of car lovers. The goal always to create a classic sleeper 1950's style 32 "Hot Road". In 2006, the family contracted with Roy Fjasted ofWest Coast Street Rod's. The intent was to build the finest 1932 Ford Sedan on the world. Neither time or finance challenges the family contract with Roy Fjasted.
Roy's resume is impressive and the quality of the workmanship is known thought Southern California as "Fjasted-quality" It would be advised to any buyer to reach to Roy or his team if you seriously interested in this car. (you can google West Coast Street Rods .net)
In 2011 Roy finished his contract, and the car was driven back to San ClementeCa,and put into the family'sprivateclassic car garage with (4) steps left for completion. Replace all the old original glass, Install a new soft top headliner, and finished interior, and possibly new tires. As it turns out time did run out as the family classic auto aficionado, passed away in 2016 after a long fight with cancer.
The car needs to be completed and enjoyed. This is a very special car which is near completion. We feel it is better to allow the new owner to add the custom interior, and add any personal final touches, which is why we have not contracted to have the car completed.
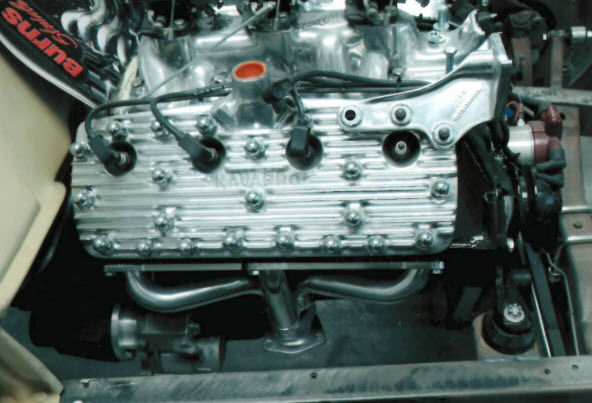
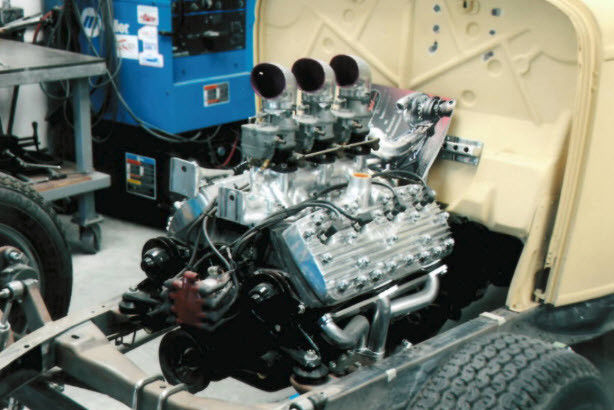
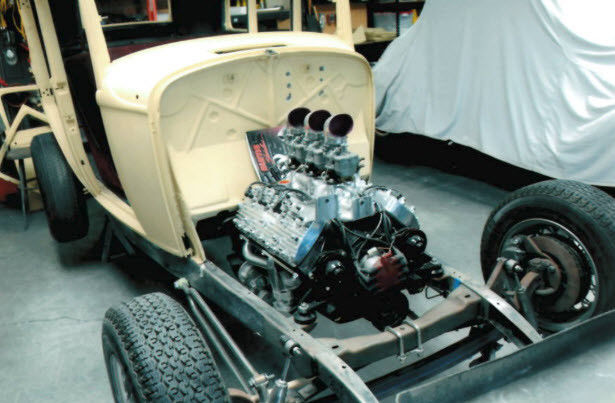
I am happy to take your calls and share a dropbox link with more photos. This is all steel car, with original fenders, and motor covers. It is powered by a 3 carburetor flathead V8. I can provide the phone number of the team that did most of the work they have forgotten more about 32's than I will ever know.
Dan
dan@nitech.com cell 949-212-6240
Now the story get's interesting! Below is all the work performed by West Coast Street Rod's between 2006 and 2011 below is the detail of 1000+ hours invested.
| Date | Description | Hours | Parts | Cost |
| 10/13/06 | Take radiator hose to auto parts store and try to match some hoses that I can cut down to fit the car. Remove brackets for throttle cables and paint black and remount. Remove mastery cylinder and pain black then mount. Tighten all brake lines. Adjust pushrod, etc. Remove boost line off motor and plug. | 5 | Radiator Hoses | $ 30.00 |
| 10/14/06 | Adjust tie rod and adjust toe in, tighten. Grease and Tighten rod ends with pions. Bleed brake system remove read wheels and clean back side detail rear brakes and shocks. Mount recovery tank hose. Clean detail and polish car. Check everything over for safety. | 5 | ||
| 10/18/06 | Mount wheels on car. Go pick up new windshield glass. Buy some gas. Get car running. Check leaks. Clean the windshield posts tracks extra clean from silicone. Mounts posts on car. Clean top and set on car. | 4 | New Glass | $ 200.00 |
| 10/19/06 | Make new rubber for windshield top and bottom. File top pines to fit posts. Mount final with top in position. Shim glass with small rubber strips. Tighten posts. Silicone glass in place. | 2 | ||
| 11/27/06 | (Start on 4-Door) Remove hood hold downs front fenders, braces, bumpers, splash apron, tire mounting bracket, etc | 2.5 | ||
| 11/28/06 | Disassemble car. Remove carpet, seats, electrical, spare tire and mount, frame horn covers, tail lights, etc. | 4 | ||
| 11/30/06 | Drain gas tank and take old fuel to station. Remove rear fenders. Gas tank, etc. Remove shifter, transmission, electrical system, dash, all wiring, steering wheel, drop, etc. Remove all exhaust. Deliver parts to strippers, rear fenders, gas tank, front fender braces, splash apron, frame horn covers. Start removing door hinge pins, Some came out some were stuck in. Lubed and hammered with a punch. Remove lots of other parts. Bag and label every part and photograph for later | 8 | ||
| 12/01/06 | Disassemble car mirrors. Finish removing door hinge pins. Remove door check straps. Remove steering arm, box, pitman arm, shock mounts, new motor mounts, horn, old motor mounts. Remove gauge cluster, etc. Bag and label everything. | 6 | ||
| 12/05/06 | Remove all body bolts and running board brackets, doors, etc. | 2 | ||
| 12/08/06 | Remove front brakes, bearings, drums, spindles, steering arm, tie rod, wheel cylinders, shoes, etc. Wash all parts from grease etc. Bag and label everything. | 3 | ||
| 12/11/06 | Go to Santa Ana and pick up the parts at the metal strippers, rear fenders, front brakes, splash apron, frame horn covers and gas tank. Hand sand every part inside and out with 80 grit. So primer will stock. | 6 | Strippers | $ 475.00 |
| 12/12/06 | Finish sanding the sheet metal parts. Hang parts, prep and spray everything with DP90 epoxy primer/sealer. | 4 | Primer | $ 30.00 |
| 12/19/06 | Strip front fender to bare metal both sides passenger side only. Prepped with acid etch. | 4 | Stripper (10 cans) | $ 60.00 |
| 12/26/06 | Strip driver side front fender. 3 coats of paint had to be removed. Then grind underside of fender rust, etc. Metal etch both sides | 4.5 | ||
| 01/03/07 | Remove brake and clutch pedal assembly. Remove the firewall. Remove the front axle, spring, wishbone, etc. Remove perches from axle. Lots of lubing and hammering to loosen organize parts. | 3 | ||
| 01/04/07 | Clean all front end parts. Organize all parts on shelf. | 1 | ||
| 02/19/07 | (2 guys) Remove all interior, headliner, etc. Remove floor panels, top side of roof, all nails in wood, etc. Remove body from chassis. Remove rear end and spring, shocks, etc. Remove all glass, windows, cowl vent. Remove all of the door hinges and stamp positions on them. Start scraping gunk from the top gutter where top was nailed. | 8 | ||
| 02/20/07 | (2 guys) Scrape and wire wheel the paint and rust at the gutter at the roof opening to clean metal. The same thing with the inside jambs and floor opening edges. Remove all small object off chassis and take to sand blasters in Huntington Beach. Remove old rusty backing, plates, brakes, shackles, etc, from the new 40 Ford rear end. Take rear end parts to strippers in Santa Ana. Clean, scrape and strip inside rear floor area. | 8 | ||
| 02/21/07 | (2 guys) Pick up the chassis from blasters. Remove rear cross member from chassis. Grind all rusty un-blasted areas. Scrape a few areas from gunk. Hang chassis, prep and primer coast with DP90 epoxy primer/sealer. Remove all of the paint from the top inside gutter that was cleaned previously to the rain gutters above doors. Gouge out the lip at the top of the rain gutters where it's spot welded to the body with razor knife and many blades. Lots of rust is hidden in there | 8 | Sandblasters & Epoxy Primer | $ 230.00 |
| 02/22/07 | (2 guys) Hand strip the outside body | 8 | ||
| 02/23/07 | (2 guys) Hand strip. Scrape and grind rusty areas. | 8 | ||
| 02/26/07 | (2 guys) Same as day before | 8 | Stripper | $ 60.00 |
| 02/27/07 | (2 guys) Same as day before | 8 | ||
| 02/28/07 | (2 guys) Remove top wood from body. Clean wood and take to Long Beach to Wood n Carrs for new wood. Continue to scrape and clean body inside everywhere. Grind and sand. | 8 | ||
| 03/01/07 | (2 guys) Sand and grind every inch inside body. Start sanding on outside, jambs, etc. | 8 | ||
| 03/02/07 | (2 guys) Same as day before, plus remove all lead from body. Prep inside and paint with DP90 epoxy sealer inside only. | 8 | ||
| 03/03/07 | Prep all metal outside of body. Smooth out body and clean with 40 grit for prepping for skim coat. | 5 | ||
| 03/04/07 | Same as day before. Metal prep body | 5 | ||
| 03/16/07 | Pick up rear end from strippers. Sand prep and primer all parts. | 3 | Stripper | $ 130.00 |
| 03/30/07 | Wire wheel both front fenders inside bead, etc. Grind, sand, etc. Remove lead. Prep and primer. | 4 | ||
| 04/02/07 | Tear down doors. Remove all parts. Disassemble hood panels and grill shell. | 3 | ||
| 04/04/07 | Finish inside of doors. Use torch to heat and scrape. Then clean with stripper and thinner. | 5 | ||
| 04/06/07 | Sand outside body. Scrape and gouge drip rails with razor knives, etc. Sand bar metal on inside of door. | 8 | ||
| 04/07/07 | Strip doors outside thick layers of paint. | 4 | ||
| 04/09/07 | (2 guys) Finish stripping doors and remove lead | 8 | ||
| 04/10/07 | (2 guys) Sand, grind, pick, scrape doors inside and outside and prep for primer. | 8 | ||
| 04/11/07 | (2 guys) Same as day before, prep hang and primer all four doors inside and out. | 7 | ||
| 04/12/07 | (2 guys) Trim bottom edges of the passenger's side wheel well and hammer out the ripples on the edges. Smooth out wheel well and prep for filler. Weld cracks and grind. Hammer out the top body panel above windshield where it was all smashed down and leaded in. Hammer and dolly the inner lip around the roof opening so the new wood will sit flat. Mount the new wood in the body clamp and screw all together. Did a little trimming to fit. Remove wood and seal wood/body area then screw back in place for good. Clean up all glue around top. | 8 | ||
| 04/16/07 | Prep and sand roof for filler. Skim coat and block sand with 40 grit long board. Prep and skim coat around rear of body and around rear window. | 7 | ||
| 04/17/07 | Install roof brackets in roof wood to body. Had to cut and weld a couple brackets. Sand and fill rear quarters, cowl and lower panels. Strip cowl vent to bare metal, sand the top panel on vent and mount on body with new rubber. Make special rubber for vent so it will sit flat with the cowl. Block sand. | 8 | ||
| 04/18/07 | Block sand and fill panels. | 7 | ||
| 04/19/07 | Same as day before. | 7 | ||
| 04/20/06 | San, grind outer doors, straighten some areas with heat and hammer, dolly. Start filling. | 7 | ||
| 04/23/07 | Sand on doors. Block and fill | 6 | ||
| 04/24/07 | Wire wheel both front fenders inside bead, etc. Grind, sand, etc. Remove lead. Prep and primer. | 6 | ||
| 04/27/07 | Filled pin holes and low spots on body. Front wheel well weld holes, front. Skim coat and block wheel well. | |||
| 04/30/07 | (2 guys) Work on wheel wells. Cut out rear lower corner of body panel. Hand form replacement panel. Fit and weld in place metal finish. Sand and grind hood panels (tops) heat shrink stretched area on top panel. Prep and skim coat panels. | 8 | ||
| 05/01/07 | (2 guys) Finish repair corner of body. Weld, grind, smooth. Prep for filler. Straightened louvers on hood side panels. Heat and shrink on louver. Hammer and dolly straight. Sand and grind hood panels, grill shell. Skim coat hood top panels. Weld a couple crack and grind. Block out both sides of top hood panels 40 grit then 80 grit prep and primer top panels both sides. Take side hood panels and grill shell to media blaster for dusting. Pick up grill shell and panels. | 8 | Blasters | $ 65.00 |
| 05/02/07 | Skim coat wheel wells, jambs, quarter panels, grind and fill posts, etc. | 7 | ||
| 05/03/07 | Grind window openings, along firewall lips, post areas, prep and skim coat body areas. | 5 | ||
| 05/04/07 | Welds on cracked rockers, grind and fill/block so they look smooth with shape of body. Block and fill body all over. | 7 | ||
| 05/07/07 | (2 guys) Sand and prep drip rails and start underside of body floor, etc. | 7 | ||
| 05/08/07 | (2 guys) Grind underside of body to bare metal every inch of metal. No more print and rust. Lots of work. Take rear end apart. Remove driver shaft and take to Doug's and 36 tube for work. | 8 | Tube | $ 40.00 |
| 05/09/07 | Grind and sand door jambs of body, rockers, around windshield openings, etc. | 7 | ||
| 05/10/07 | (2 guys) Prep body inside window openings to inside of openings everywhere else. Mask off inside body so no overspray when primer. Go back to Doug Lindow's to pick up the driveshaft tube for degreasing. Take tube and your stock tube from sedan and radius rods from 40 to chemical strippers in Santa Ana. | 8 | ||
| 05/11/07 | (2 guys) Repair low spot on left rear corner of body. Sanding, filling, etc. Block sand final 80. Grind all edges, panels, etc. Fill pin holes, fix all the dents in the jambs, around hinge areas, etc. Prep and primer body. Lots of work! | 8 | ||
| 05/14/07 | Hand strip all seven window garnish moldings inside and out. Strip the dash, firewall. The firewall had lots of coats of paint and bondo. Lots of patch repairs had to grind all the heavy bondo from the firewall and get ready for the sand blasters. Mask the grill shell inserts for blasting. | 7 | ||
| 05/15/07 | Clean all the original letches and window regulators a couple of times to get extra clean. Steel wool the light rust. Lots of grease. Strip and clean the front spindles. Go to Santa Ana and pick up rear end part torque tube and radius rods. | 6 | Stripper | $ 125.00 |
| 05/16/07 | Grind back underside of the cowl vent and prep for primer. Take firewall, grind insert, garnish moldings, dash panel, header panel, door window tracks to the sandblaster and picked up later. Hand the parts primer all parts also prime all hood panels and grill shell. | 6 | Sand Blaster | $ 135.00 |
| 05/17/07 | Grind gas tank everywhere. Thank has lots of dents. Bottom lip was bent over. Had to hammer and dolly flat and straight entire lip. Cut out old vent tube on side of tank lip. Made patch and weld, grind smooth. Primer owl vent and inside window openings in body. Remove all of the masking inside body. Start filing gas tank top side only and blocking. | 6 | ||
| 05/25/07 | Fill and block sand the entire bottom side of the gas tank | 2 | ||
| 06/02/07 | Block sand first primer coat on body with 80 grit. | 7 | ||
| 06/03/07 | Block sand body, jambs, etc. | 6 | ||
| 06/05/07 | (2 guys) Remove center cross member from chassis. Cut out rivets. Start to set up motor trany. Grind clearance on aluminum adapter for starter. Adapter won't fit because guide pins won't align with holes. Take parts and adapter to Doug Lindow's to check on his jog. The holes ere off and oversized. Brought back our 40 axle housings and center for suspension bars set up. Continue to block and sand body with 80 grit. | 8 | ||
| 06/06/07 | (2 guys) Continue to block sand body with 80 grit. Fill and repair small blems as we find them all the bottom edges of the rockers, jambs, etc. Mask off body inside and primer coat body 2nd coating. | |||
| 06/07/07 | (2 guys) Finish gas tank. Block and fill. Lots of work to get shape correct. 40 grit then final 80 grit. Hang primer 1st heavy coating. Mount the trans and adapter to engine had to do some repairing filling, etc. For everything align, pins, bolts, etc. Mount motor and trans in the chassis. Measure for new center cross member and order. Start on firewall cut out bad areas and file holes. | 8 | ||
| 06/08/07 | (2 guys) Remove motor and trany and mounts. Drill and grind rivets to remove front cross member from rails. Grind frame rails, remove rust and paint from areas that need work, repairs, welding, etc. Make new pieces to replace in the firewall. Tack weld and hammer weld pieces. | 8 | ||
| 06/09/07 | (2 guys) Work on frame rails. Had to cut out some areas that were repaired poorly sometime ago. Cracked patches etc. Had to heat and hammer some areas. Hammer all of the ripples dents and bends on the same rail lips or edges make even for the boxing plates fit perfect. Cut lots of plugs to fill holes that aren't needed old steering holes, etc. | 8 | ||
| 06/11/07 | Paid for custom center cross member from Carl, and Boxing plates for front part, front cross member and cross member for rear end bars to connect to frame. | 0 | Cost for list | $ 675.00 |
| 06/12/07 | Finish cutting out plugs for frame rails. Hammer frame rail straight more in some areas. Weld and grind fifty holes and patches, cracks in driver's side frame rail. | 7 | ||
| 06/13/07 | Same as the day before to the passenger's side frame rail | 6 | ||
| 06/14/07 | (2 guys) Grind all welds. Finish smooth both side inside and outside. Grind and clean up all edges of rails. Set up all cross members, mock up chassis. Take apart and weld threaded bungs on insides of rails. Tap all threads clean, prep and primer inside frame rails for rust protection. | 7 | ||
| 06/15/07 | Drill out holes in front and rear cross members. Assemble rails and all the cross members for final assembly. Square up and level everything first off. Clamp everything and measure each hold for fit. Running board, body holes, etc. Measured off other chassis. Push, pull and tack weld center cross member in place. Start welding. Drill out last eight body holes for threaded bungs on top of chassis and chamber. | 6 | ||
| 06/18/07 | Fit boxing plates to front section of chassis. Cut and grind for perfect fit inside frame rail lips. Start to tack weld. | 4 | ||
| 06/19/07 | (2 guys) Weld all boxing plates complete. Cut out old front cross member. Cut out more old welded screw up areas on firewall. Start grinding welds on frame with big grinder. Weld in small front boxing plate section and grind. | 8 | ||
| 06/20/07 | Finish grinding frame everywhere extra nice. Take chassis to Carl's and install the chassis in the jig. Fit and weld the front cross member in frame set up chassis and level. Remove rear cross member. | 7 | Carl's Help | $ 100.00 |
| 06/21/07 | Hammer welded the firewall finish, making patch panels. Slightly modified a couple of areas to look better. Filled a ton of holes. Cracks, etc., and straighten some dented areas lots of work welding everything. | 6.5 | ||
| 06/22/07 | Grind all welds front and back sides of firewall extra nice. | 5 | ||
| 06/25/07 | Filled and block sand front side of firewall. Had to heat shrink some stretched areas. Grind and fill back side. | 5 | ||
| 06/27/07 | Block and fill firewall | 3 | ||
| 06/30/07 | Go pick new spring and shackles for the rear end set up. Start to mock up spring. Disassemble rear spring so we could mount the main leaf first. Then clamp together all leafs. Had to cut out old steel bushing sleeves from 40 rear end. Mock up rear end in close to position. Grind to stock cross member smooth around edges etc. Drill out end tables and grind areas for welds on holes. | 5 | Spring and shackles | $ 325.00 |
| 07/02/07 | (2 guys) Finish up firewall skim and block a lot of hand sanding, weld a few more cracks on bottom base area and grind and file edges and welds. Prep and primer firewall. Cut out plugs to fill the holes in the rear cross member. Weld all holes inside and out. Grind welds and mount in frame rails. Start cutting out areas in the rear cross member for clearance for new 40 for spring. | 8 | ||
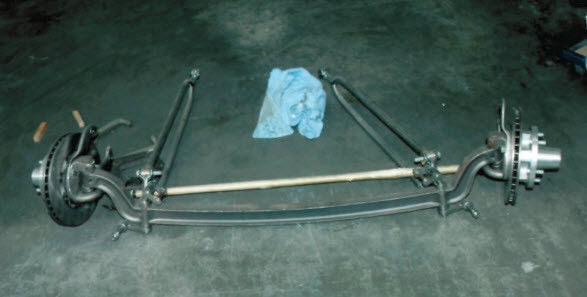
| 07/05/07 | Remove rear spring and disassemble springs. Set up rear end and heat and bend spring perches so they are parallel at the shackle point. Go pick up parts from Carl for front end. Mark holes on front frame rails where the hairpin radius rods will mount. Parts included: S.S. Hairpin Radius Rods $475; Forged Axle $250; Posie Spring $130; Vega Box $360; Box Mount $40; Front Chrome Shocks Kit $250; 1 Set SS. Shackles $65; 1 Set S.S. Perches $100; 1 Set S.S. Bat Wings $145; 1 Set S.S. Spring Pads with U-Bolts $85; 1 Set S.S. Spindle Tops | 5 | Parts Total: | $ 1,935.00 |
| 07/06/07 | (2 guys) Reassemble the rear end, spring, etc. A little file and pain on the heated perches. Assemble the front axle, springs, shackles, etc. On the table Cut more plugs for more frame holes to fill. Drill holes through frame rails and boxing plates for steel sleeve for new hairpin radius rods. Tack weld tubes in place. Make boxing plates for center openings of frame cut and grind fit perfect. Heat the frame rails with a torch to release the stress at the rear cross member point. | 8 | ||
| 07/10/07 | (2 guys) Grind rear cross member on inside welds. Assemble rear spring. Grind both sides of rear leaf spring to fit the cross member. Cut off and grind round and smooth on the ends of all leaf springs. Assemble again and mount on rear end and mount on frame. Start mounting front end on the chassis. Check level of chassis over and over. Start fitting rear ladder bars. Install bushings, rod ends, etc. Start mock up of rear end. Checking heights and angles. | 8 | ||
| 07/11/07 | Remove rear end again. Disassemble springs again. Go to a mono leaf set up for now so we get ride height. Make block spacer, and then we can set up suspension, grind mounting plates for rear bars to fit housing correctly. Make patterns, then parts from plate for the front mounts for ladder bars to mount to cross member in the chassis that holds the front ladder bar connection. Tack weld in place. Finish making the four brackets and tack weld in place. Lots of checking angles as necessary over and over. | 8 | ||
| 07/12/07 | Set up front brackets with some used shocks so we don't scratch the new chromed ones. Grind the brackets to fit the angle where it mounts to the frame. Weld brackets to chassis at the same time I spread the front frame horns to fit the front spreader bar. Drive to Doug Lindows shop in Los Alamitos to pick up one of the rear axles for the rear end. Set up frame with blocks between frame and axle housing for correct ride height. Remove bars and bolts and move rear cross member back half an inch. For better fit-wheel to fender. After lots of measuring for correct wheel base and pinion angle we mounted the body. Tapped out threads for rear fenders on body holes and mounted rear fenders. Install rear axle and wheel and tire to check location in fender front to back. File ends of housing for smooth fit of new axles and adapters. We noticed the groove on the end of the housing mounts aren't deep enough to fit flat. Need a little work from Doug. Remove all rear suspension parts again from chassis. Lower the frame and body to the ground. Then install the wheels and tires under the fenders. Mock up in position and measure the exact of the rear end. Need drum to drum. (57 inch's over all drum to drum) | 10 | ||
| 07/13/07 | (2 guys) Remove rear fenders, body from chassis. Install rear end suspension back in chassis. Cut tack weld on driver's side rear cross member and move back in 1/8 inch and weld in place. Custom fit a template for rear boxing plates and cut and grind for perfect fit. Tack weld all boxing plates in place. Grind the edges of lips of frame rails that stick out over boxing plates for smooth welds. | 6 | ||
| 07/14/07 | Finish welding rear cross member in place. Weld all 4 center and rear boxing plates. Skip here to there so not to build up too much heat. | 4 | ||
| 07/16/07 | Set up flat head motor and trany in chassis. Custom fit motor mount. Mount the firewall remove and notch a small area. Then remount. Grind trans casting a little to clear cross member tube. Grind welds on boxing plates. Weld motor mounts in place. Cut and grind front leaf springs round and smooth on ends. Hole saw holes in rear cross member for exhaust system. Cut and grind clearance for rear shocks in lip of cross member. Hole saw hole for weld bung for upper shocks in cross member. Cut brackets for new lower shock mounts. | 8 | ||
| 07/17/07 | Try to mount spindles on new axle. One side boss is too thick. Finish rear lower shock brackets. Mock up lower shock mounts on rear end. Make special thick spacers and weld to brackets. Lots of fabricating and mocking up. | 6 | ||
| 07/18/07 | Remove rear end. Disassemble rear end. Finish welding all the way around the table. Deliver the rear end to Doug Lindow for narrowing. Cut off arms from spindles and custom grind smooth. | 6 | ||
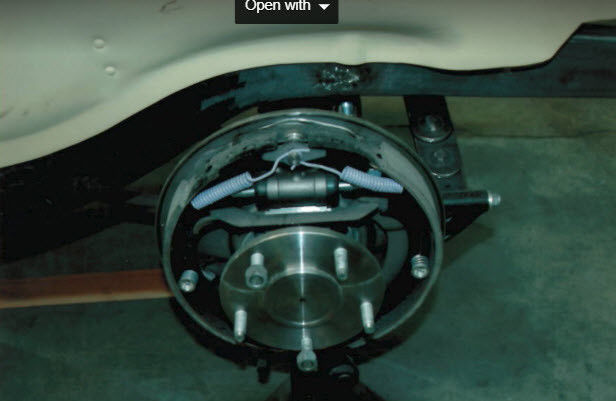
| 07/19/07 | Locate bolts to mount steering arms on spindles. Cut down bolts lengths, mount spindles and tie rods. Grind the last of the boxing plates. Drove to auto parts and buy a trany mount. Drive to Doug Lindow's and pick up axles to have returned. They were too long. Drive to Carl's and pick up new front brake kit. G.M. Disc brakes with 5 on 5.5 bolt pattern. | 8 | Brake Kit | $ 725.00 |
| 07/23/07 | Drove to Doug Lindow's and picked up finished rear end. Paid the Bill. Cut 1 3/16th off both rear axles. Grind smooth Wet sand aluminum bearing supports to fit better seat the axle seals in housing ends. | 4 | Doug Lindow | $ 1,250.00 |
| 07/24/07 | Drive to Santa Ana to drop off the rear main leaf spring to Deaver's to have narrowed. | 1 | ||
| 07/31/07 | Drive to Santa Ana and pick up the rear main leaf spring. Grind the springs smooth everywhere. Grind the Teflon pads all round and smooth. Grind all leaf springs smooth from foundry finish. Edges, ends, etc. Assemble springs and mount on rear end. Had to hammer the springs pads flatter so they are tighter against the sides. Grind clamps extra nice. | 5 | ||
| 08/01/07 | PARTS TOTAL-Double Pedal Clutch/Brake assembly with dual booster and master cylinder, pus rod, booster mount, etc. $400; 40 rear end from Tom: $150 | 0 | Parts Total | $ 550.00 |
| 08/06/07 | Set body on 2x4 wood to keep from frame for access to mount rear end suspension. Work on the brakes, axles, etc. Grind down the aluminum and adapters to clear the brake center bar. Got everything to fit nice. | 3 | ||
| 08/07/07 | Remove front axle (bad one) then assemble front end with a new axle. Tried to mount spindles but one old king pin was oversized so I ordered a new king pin kit. | 1 | King pin kit | $ 30.00 |
| 08/27/07 | Remove body from frame. Work on floor. Cut out the bungs from the floor channel lips. Straighten the front lip where it had two areas that were folded down. Start cutting pieces from 16 gauge to fill in cut out areas (20 patches) Grind to fit | 6 | ||
| 08/28/07 | Hammer and dolly front floor lip straight grind all areas for welding. Clamp and tack weld patches in place. Hammer straight, start cutting. 5/8 tubing for floor framing and fitting floor. Weld and hammer all patches on floor lips. (20) Grind all welds top and bottom. Cut patches for old battery cable holes in the floor. Grind around holes in floor to be welded. | 6 | ||
| 08/30/07 | Weld and grind over fifty small holes in floor, front to back had to grind underside of floor weld and skim each area with bondo. Start clamping tubing framing in place and tack weld. Had to straighten cross member so they lay flat. | 6 | ||
| 09/05/07 | Work on floor tubing framing. Cut, grind, weld, grind, prep and primer framings. Had more fitting begin fabricating floor sheet metal panels. Cut, shear, bend, etc. | 8 | ||
| 09/06/07 | Continue building custom floor. Fit framings to body flooring drill out floor panels mounting holds in the framings for threaded bungs and weld bungs in place. Grind all welds, file and sand and primer. Sand underside of floor where I filled the welded areas with 80 frit. | 6 | ||
| 09/07/07 | (2 guys) Straighten floor frames after welds worded the tubing a little hammer and doley the large dents in the rear floor area behind rear end area. Mount floor panels to framings screw tight, then install 2 center bars on framings for more support. Weld bars, grind and primer. Start clamping inside floor channels. | 5 | ||
| 09/12/07 | Unbolt front end and remove the leaf springs except (2) so I can get chassis at ride height. So I can set up the steering box. Mount spindles and steering arms, drag link, tie rod, pitman arm, etc. Set up the proper angles and distances of everything. Tack weld mount to chassis. Set up hoist and remove motor and trany. | 3 | ||
| 09/24/07 | First time the body is mounted to the new chassis. Had to dent the floor a little so the rear shock would clear the floor. Find longer upper rear shock bolts. Hand to drill out welded spools that's welded to the cross member and run the bolts through the back sides. Slightly slot the body mounting holes so we could bolt body to the chassis. It fit pretty close! Make two spacers for rear body bolts and tack weld in place bolt down body solid. | 6 | ||
| 10/01/07 | Pull shocks and unbolt rear end. Drop out rear end from frame. Remove all but two springs and the main leaf. Make a spacer and mount rear end back in frame. Mount the rear wheels and check fender fit. Move car next to the welder. Clamp the floor framings in floor and tack weld in place, weld floor framing complete 16 ft. of welding. | 6 | ||
| 10/02/07 | Install disc brakes set up on front end. Wire brush the welds on floor framing and finish a few welds. Refit panels a little for the screw and grind the lips of the panels a little shorter so they sit down tighter to the framing. | 4 | ||
| 10/03/07 | Put engine on hoist. Mount the firewall to the body and frame. Had to take on and off a couple of times to trim the rubber and refit. Trim the firewall a little to clear the transmission. Custom grind the rubber and shim the firewall to make the firewall fit tight to the rubber lip. Mount the motor and trany. Layout clutch brake pedal assembly. | 5 | ||
| 10/04/07 | Work on floor area between the firewall and seat area. Fabricate the right and left foot kick up panels and screw them to the floor. Start fab. Floor framing pieces. | 5 | ||
| 10/11/07 | Work on floor framing. Start fabricating the side pieces that weld into the front bolt to frame/body areas. Unbolt and remove front suspension. Mark the under frame area for notching underside of the front leaf spring cross member area. So the leaf spring clears frame front being lower. Cut out frame and start fitting to openings. Start fabricating the plates to box in the front. Shock brackets. Use 1/8 plate. | 7 | ||
| 10/12/07 | Grind, fit, bend to shape the plates to box front shock brackets. Heat with torch and hammer to shape, tack weld spring areas and shock brackets plates in place. Tap out all door hinges bolt holes and clean out threads on bolts for doors. | 5 | ||
| 10/15/07 | (2 guys) Repaired the small pocket areas for striker adjuster on center jambs, b-pillar. They were screwed up from Previously mounted with too long of screws. Mounted all the fenders and running boards, headlight bar, braces, etc. So see how everything aligns since we built and new chassis install doors hardware, strikers, dovetails, etc. Stripped and primer original male dove tails. There better than the repo ones. Start cutting and fitting the brackets to be welded to the frame for the inside running boards brackets supports. Continue building front floor area. | 8 | ||
| 10/16/07 | Worked on floor. Fabricate some special shaped tubing for front of framing so it follows the angle of the toe boards. Drill holes and weld threaded bungs into tubes then weld tubes in place. Bend lower lips on lower toe board panels to proper angles. | 6 | ||
| 10/17/07 | (2 guys) Continue on floor. Fab main flat front panel. Brake lip. Cut opening to clear trans. Fit to framing. Trim and grind panel for a perfect fit. | 5 | ||
| 10/18/07 | (2 guys) Fit the brake and clutch pedal assembly to the floor and chassis then tack weld in place. Mark and cut holes in toe board panel for pedal clearance. Remove motor/trany. Grind inside panels to fit flush to tube framing. Measure and layout mounting holes in floor panels. Drill holes then mount and transfer to framing. Remove panel and drill out 27 holes to fit the threaded bungs. Tack weld then weld all threaded bungs. Cut off large chunk off bottom of trany casting. Grind smooth. | 7 | ||
| 10/19/07 | Grind welds where bungs were installed then tap out all threads. Prep and primer tubing framing. Make plugs for ends of custom fabed tubes. Weld and grind, file smooth. File and fine tune the floor panel screw holes to align with threaded gungs in framing so all screws can be installed with your fingers. Prep edges for welding tunnel pieces. Primer and mount panel. | 6 | ||
| 10/24/07 | Hand form the two panels to form the tunnel. Make patterns then sheet metal 16 gauge all floor panels. Cut, grind, shape, hammer and dolly special shapes and butt panels perfect fit gaps for butt welding everything make special lip for upper edge of firewall tack weld everything in place. | 7 | ||
| 10/25/07 | Weld entire floor and tunnel areas. Grind welds on front sides. Remove floor panel and cut out shifter area. Grind all welds, sand and primer both sides. | 5 | ||
| 10/29/07 | File out holes in center jambs that holds the door rubber stops clean off burrs and mount the rubbers. Mount the doors and adjust strikers. Clean out gaps around door hinges from being filled with bondo and primer. | 2 | ||
| 10/31/07 | Remove rear fenders and running boards. Work on back doors alignment with rear quarter panels. Doors were at least 1/8 inch or more to far in. Had to carefully rework hinges. Weld all of the threaded holes grind. Re-drill and tap all holes in all hinges so doors are flush with the body. Lots of work. | 7 | ||
| 11/01/07 | Take rear doors on and off several times to bend all hinges until doors are in proper location to far back and rubbed in certain areas around door openings. | 5 | ||
| 11/02/07 | Grind door edges clean where we need to weld edges for tighter gaps. Tack weld 1/8 inch rod to pass. Rear door and start hammer welding. Had to grind down some areas that were too tight. | 5 | ||
| 11/05/07 | Remove motor and trany try to set up clutch, but had the wrong flywheel. Weld edges of the driver's side front and rear doors for tighter and straighter gaps. Hard to weld bottom edges because they pop out from rust inside every weld. Takes lots of time. | 6 | ||
| 11/06/07 | Weld driver's side front and rear door same as day before weld and grind. Mount and start grinding gap to body opening | 5 | ||
| 11/07/07 | Work on passenger side doors grind edges, weld rod around rear door. Hammer weld edges and start door. Hammer weld edges and start door. Hammer weld edges and start grinding | 6 | ||
| 11/08/07 | Work on passenger's side doors. Finish welding and grinding gaps on rear door, lots of work. Start on front door gaps, lots of welding and grinding both sides. | 6 | ||
| 11/09/07 | Finish front passengers door gaps. Lots of work. Had to rework hinges to get front part of door flush with the cowl and posts panels, about an 1/8 inch. Hammer weld and grind both sides all the way around. | 7 | ||
| 11/10/07 | More welding gaps on the driver front door. | 2 | ||
| 11/19/07 | Grind all welds both sides of the driver's side front door gaps smooth. Mount door and grind gaps to fit door opening. Prep back side lip of door for filling. | 3 | ||
| 11/20/07 | Work on doors. Hammer and dolly the lips on all 4-doors to fit flush with all front and rear body panels so very little bondo has to go on the door edges. Nice thin door edges. | 4 | ||
| 11/26/07 | (2 guys) Mount the front suspension on chassis to roll car. Hammer weld backside door lips where some bead edges taper away very thin so there's no chance of cracking later. Had to weld most of the back sides driver's side doors. Grind back sides of the driver's side doors. | 8 | ||
| 11/27/07 | Grind the backsides of the both side front and rear doors every nook and crany. Grind, scrape, gouge, pick, scratch, etc., until. Very time consuming! Start to fill and block edges. | 8 | ||
| 11/29/07 | Same as day before | 8 | ||
| 12/03/07 | Grind and skim coat the outside surface around edges of the four doors to fill and protect the bare metal from getting dirty. Grind, scratch, and pick up the backside jambs of the last of the four doors. Skim coat everything and block sand with 40 grit the 80. Mask and prier all four doors backside jambs first coat. Nice finish. | 6 | ||
| 12/04/07 | Put latches and hardware in all doors and mount on car. | 1 | ||
| 01/07/08 | Work on doors. Block sand all of the filled outer edges previously done on all four doors. | 3 | ||
| 01/18/08 | Mount all doors and adjust doors stickers. Prep body and all doors for final fill and fit together. Sand with 40 areas to fill to blend in doors with front and rear of body. Start filling and sanding. | 4 | ||
| 01/19/08 | Sand and skim coat edges of doors and body on right side and block sand both sides 40 grit long board | 4 | ||
| 01/21/08 | Continue to skim and block perimeter of doors and body so it's as flush as possible on left side | 6 | ||
| 01/29/08 | Block sand left side and fill more and more 40 grit long board | 4 | ||
| 01/30/08 | Block and fill right side of doors and body panels. | 4 | ||
| 01/31/08 | Cont. skim and block long board right side of car 40 grit ready for 80 grit now. | 5 | ||
| 02/06/08 | Prep, skim coat and block rockers/beltline to build up edges for fit. Same with door bead posts area. Remove doors and cut edges. Fill and sand edges more (40 grit) Ready for 80 grit. | 7 | ||
| 02/07/08 | (2 guys) Build up both sides of flower beads with doors. Block and fill 40 grit. Start skim coating front areas of body for 80 grit sanding. | 8 | ||
| 02/08/08 | Skim coat door for 80 grit paper. Start block sanding with 80 grit long board. | 5 | ||
| 02/11/08 | Block sand body 80 grit. | 5 | ||
| 02/12/08 | (2 guys) Skim coat and block 80 grit (right side) Remove front and rear doors. Clean up all the edges from filling. Prep and masks jambs and doors right side. Primer coat jambs and doors. | 7 | ||
| 02/13/08 | (2 guys) Same thing as day before but left side of car. Doors, body jambs, etc. Prep, mask and primer. Start block sanding firewall with 80 grit. Lots of blocking. | 8 | ||
| 02/14/08 | Finish blocking firewall prep and fill bottom area where it was modified to fit new floor. Prep and primer firewall | 4 | ||
| 02/15/08 | Block sand rear of body with 80 grit and upper and lower belt lines to get straighter. | 5 | ||
| 02/18/08 | (2 guys) Mount doors and start block sanding doors and body together 80 grit. Fill a few areas as we go. For perfect fit. | |||
| 02/19/08 | Start from top of body at roof gutter to drip rails and down and sand 80 grit for final primer coat. Around windshield opening door jambs, etc. Lots of sanding 2 guys all day. | 8 | ||
| 02/20/08 | (2 guys) Mount cowl vent again. Adjust perfect the drill alignment pin holes. Fill and block together with cowl for perfect fit. Continue blocking and prepping body and doors. | 8 | ||
| 02/21/08 | (2 guys) Block sanding all day with 80 grit on body, edges of beltlines, all edges of the doors, etc. Mask doors and primer all front side doors. | 8 | ||
| 02/25/08 | Fill pin holes and block sand body 80 grit. | 6 | ||
| 02/26/08 | Block sand firewall with 80 grit again to get straighter lines. Lots of detail on firewall. | 6 | ||
| 02/27/08 | (2 guys) Fill and sand small blems. Block sand jambs again and underside rockers, etc. final block everything. | 7 | ||
| 02/28/08 | (2 guys) Same as day before-prep for primer | 8 | ||
| 03/05/08 | Had to heat shrink an area in right rear corner of body. Fill and block sand straight. | 3 | ||
| 03/06/08 | (2 guys) Mask off body inside and out final touch ups and spay coat of primer complete 1/2 gallon of poly primer. | 5 | ||
| 03/11/08 | Hang all doors, strikers, rubber dove tails, hinges, etc. | 1 | ||
| 04/01/08 | (2 guys) Work with Tom on mounting transmission to motor and mount t in car. Had to grind the clutch fork to clear throw out bearing sides. Ream out the fork too fit the shaft. | 5 | ||
| 04/21/08 | Hammer and dolly the driver's side front fender. Lots of dents and ripples. Had to heat shrink some areas. | 4 | ||
| 04/23/08 | Work on driver's side front fender. Heat shrink the top rear of fender. Hammer and dolly. Cut out damaged area at rear of fender side with bead and fabricate a new pieced to go over solid wire. Hammer front to fender to shape. It was squared off from prior repairs. | 6 | ||
| 05/12/08 | No hours | 0 | Clutch Cylinders, etc | $ 275.00 |
| 05/15/08 | Sand DP90 from right rear fender to reveal damaged areas. Cut out rotted area that bolts to running board. Grind and sand blast rust. Fab. New piece and tack weld in place. Start stripping the left rear fender. | 3 | ||
| 05/16/08 | Work on rear fenders. Finish cutting out rotted metal and replace areas. Weld, grind, hammer and dolly dents and make fenders straight. | 7 | ||
| 05/19/08 | Start stripping the inside left rear fender inside only. | 2 | ||
| 05/20/08 | Finish prepping left rear fender inside and outside complete with 40 grit. Skim coat both sides of fender. Begin cutting with 40 grit. | 6 | ||
| 05/21/08 | Finish block sanding left rear fender inside and outside with 40 grit. Re-skim where needed. Begin to prep the right rear fender. Lots of work | 8 | ||
| 05/22/08 | Strip the outside of right rear fender. Skim coat repaired areas on inside and skim coat. Same with the outside. Cut filler inside and out with 40 grit, re-skim low areas and keep blocking. Cut out dimples on the front upper driver front fender that were badly damaged. Weld in new pieces and weld in new patches on fender other areas. | 6 | ||
| 05/27/08 | Rear fenders with 80 grit. Fill pin holes and blems, prep and primer first coating. | 8 | ||
| 05/28/08 | Finish front driver's side front fenders a couple more repairs grind all welds on both side and prep. Start on the passenger front fender. Hammer and dolly damaged areas. Start cutting out bad areas and fab new prices. | 7 | ||
| 05/29/08 | Continue metal work on passenger's side front fender. Hand form a piece to replace a damaged area at top of fender hammer weld in place. Start sanding, grinding, prepping underside of left front fender for filler with 40 grit. | 7 | ||
| 06/02/08 | Finish prepping left front fender then skim coat underside. Prep the outside of left front fender and skim coat every inch had to do a little straightening as we skimmed. Begin blocking underside with 40 grit. | 6 | ||
| 06/03/08 | Finish underside of left front with 40 grit then skim coat again for pin holes and glems. Block sand again with 80 grit. Start cutting and prepping with 40 grit on the outside of fender | 7 | ||
| 06/04/08 | Finish filling and blocking outside of the right front fender with 40 grit and skim coat for 80 grit. | 3 | ||
| 06/17/08 | Finish up final skim with 80 grit on driver front fender ready for primer | 2 | ||
| 06/18/08 | Grind and prep inside of right front fender and skim coat complete inside. Weld in small patch in front area for splash apron mounting hole. Hammer and dolly some rough area around the lips and edges. | 7 | ||
| 06/20/08 | Grind, sand, and strip outside of right front fender and prep for filler. Skim coat outside of fender. Start block sanding the inside of fender. Lots of work. | 7 | ||
| 06/21/08 | Sand the inside of the passenger's side front fender with 40 grit. Clean out seams. Skim coat and cut with 80 grit. Start sanding outside of fender with 40 grit. | 5 | ||
| 06/23/08 | Continue cut outside of passenger's side front fender with 40 grit until straight. Had to heat shrink an area and rework. Skim coat both sides of fender. | 6 | ||
| 06/24/08 | Block sand final skim coat with 80 grit on passenger front fender. Ready for primer. Put car on jacks and drop out of the rear end. Remove leaf springs and add two leafs, and new spacer so far sits level. Start to mount the running boards and rear fenders on the car. | 6 | ||
| 06/25/08 | Mock up position for clutch master cylinder. Cut bracket for clearance of push rod. Mount a hem joint on pedal instead of the clevis. Fabricate a custom sold aluminum spacer to position the master cylinder to the mounting bracket. | 3 | ||
| 06/26/08 | Mount the gas tank; frame horn covers spare tire mount, etc. on rear of car for final fit. Mount all of the garnish moldings and mount rear regulator panels in place. Mount the dash and cowl vent. Prep and primer the driver's side front fender both sides first coat. | 6 | ||
| 06/30/08 | Fabricate a steel plate to fit in the pedal assembly for the clutch m/c. Cut, fit and weld to pedal bracket. | 2 | ||
| 07/01/08 | Grind the welds both side of the pedal bracket. Mount all parts, slave cylinder, etc. Mock up booster and brake m/c. Tack weld mounting bracket in place on frame. Try to fit new sway bar in rear. No room anywhere. Take a new rear brake drums to machine shop to machine inside edge to clear shoes. Primer first coat on passenger front fender. | 5 | ||
| 07/08/08 | Start mounting the front fenders. Grind left front fender to fit around the motor mount. | 1 | ||
| 07/09/08 | Swap new polyurethane motor mounts with old ones there solid under start to mount right front fender. Trim around motor mount area. Slot a few holes slightly to fit and bolt fender to car remove left front fender and weld up and grime hole to correct position and replace fender. Grind all 4 front and rear bumper brackets nice and smooth the primer with spray can. | 5 | Motor Mounts | $ 35.00 |
| 07/10/08 | Start mounting headlight bar. Remove left front fender again and trim around motor mount again. Cut and fit webbing to the frame rails for front fenders. Replace fenders and start to fit grill shell and new radiator make special rubber pads for radiator start cleaning all of the hood hardware. Go buy parts: Splash apron, front bumper bracket bolts, lacing for firewall and grill shell & radiator support rods. | 5 | Parts | $ 100.00 |
| 07/11/08 | Put hood panels together and place hood on car. Clean up windshield hinges and prier. Tap out hole and install hinges. Install front hood hardware and hood stay. Clean out threads and mount header panel above windshield. The install windshield pull hood apart and start filing and fitting gaps. Cut down new hood support rods and install. Lots of fitting taking on and off several times. | 6 | ||
| 07/14/08 | Finish making webbing for the firewall and grill shell. Then mount the webbing, hood handles hold down hardware. Mount the new splash apron and cut ends to widen splash to fit properly make wedge pieces to fill in gaps and tack weld in place. | 5 | ||
| 08/18/08 | Remove hood, headlight bar, grill shell, radiator, hood hardware and front fenders. Grind repairs on new splash apron complete then skim coat splash apron both sides. | 4 | ||
| 08/19/08 | Block sand splash apron with 40 grit. Skim low areas and cut with 80 grit and primer. | 4 | ||
| 10/09/08 | Measure and order steering parts drive to lime works and pick up a mock up steering column, steering wheel, drop, u-joints and shaft and drop off new T-5 shifter to be altered. Ordered electrical kit. | 3 | Electrical Wiring Kit | $ 350.00 |
| 10/14/08 | Set up lift on motor. Remove slave cylinder and unbolt trans. Remove motor & trans. Remove trans from motor. Remove bell housing from trans. Make template for return spring bracket for clutch form inside. Fab from 1/8 inch plate. Cut, drill and paint. Mount everything back on motor. Start laying out steering column. Column to short. Remove dash panel. Remove lower column bracket, carefully mark and cut out center oval from dash panel. Make a plug for extra hole in dash panel make a template then steel piece to fill center of dash. Hammer weld the dash pieces in place. | 8 | ||
| 10/17/08 | Mount the motor and trany back in car. Mount slave cylinder. Locate and heim end to go on end of push rod. Set up unit. | 2 | ||
| 10/21/08 | Grind the welds from the center oval panel in dash. Both sides and primer. Scribe a center line across the dash panel. Cut the dash in half and file the edges. Cut a 1 1/4 inch strip from 18 gauge to widen the height of the dash to fit your gauge cluster. Tack weld the strip to the upper half of dash and start hammer welding drive to Santa Ana for S-10 shifter, then drive to Whittier to drop off at lime works and pick up a longer steering column. | 8 | ||
| 10/22/08 | Put car in the air and tack weld the running board frame brackets to the frame then remove running boards. Install drop on new column. Place floor back in ca. Custom fabricate a new battery box to mount to frame under front seat, cut, grind, weld, drill. Drive to Ace then Sears for new battery, side posts. Bitchen fit! Drill and tap frame and mount later I will weld threaded bungs in frame. | 8 | New Battery & S-10 Shifter | $ 150.00 |
| 10/23/08 | Fit the bottom half of the dash to upper lengthen half. Tack weld in place, then hammer weld top and bottom of strip, complete. Lots of work. | 7 | ||
| 10/27/08 | Finish welding dash then grind all welds both sides | 2 | ||
| 10/28/08 | Sand all primer off dash then finish prepping with 40 grit and back of panel, nice. Straighten bottom lip that was all wavy. | 4 | ||
| 10/31/08 | Layout dash and make template for gauges, studs, etc. Transfer to dash and hole saw all holes. Bolt bezel on dash check fit. Prep both sides and skim coat both sides of dash. | 3 | ||
| 11/01/08 | Sand and skim coat dash front and back. Cut with 40 grit and re-skim both front and back. Re-skim and cut with 80 grit. Hang and primer. Cut the dash mounts square and make new piece to fit to new dash. Lengthen mount tabs 1 1/2 drill out and add new bungs. Weld tables and weld new bungs. Grind and file. Skim coat jambs where they were grinded unscrew dipstick and mount left headers. | 7 | ||
| 11/11/08 | (2 guys) Put car on stands. Remove header and cut dipstick tube shorter. Hand grind the water necks to fit new hoses properly. File and sand finish nice. Mount the dash and grind the speedo hole to fit the speedo better. Notch the speedo hole. Drive to have the dip stick tube bent at a tube bender. File out the holes in dash to fit gauges better. Repair original water temp gauge g-bracket that was broken. Braze and file. Cut, fit re-stamp dip stick. Mount gauges in dash and to car. | 8 | 2 Pedal Pad Mounts | $ 40.00 |
| 11/12/08 | Drill and tap pedal adaptors to pipe thread. Grind ends of pedals to clear pads and mount pads. Cut 1/4 inch plate to fab sent base for front seat. Grind ends and bevel. Weld together. Grind welds. Drill and tap holes to fit original seat runners. Fit seat inside car. Locate mounting holds. Drill out seat base then transfer to floor. Drill out floor and check clearance for under pads. | 7 | ||
| 11/13/08 | (2 guys) Cut 1/4 inch plate into four pieces. Fit under floor too bolt seats down. Drill and tap special threaded bungs. Drill out plates to fit bungs and weld in place. Locate pads under floor, then drill four holes for each pads. Rossette weld all pads too floor. Clean out threads Rattle canned bare metal. Lube tracks bolt everything together and slide seat on tracks. Make plate to mount column. Drop to dash. Drill tap and bend too fit. Clamp column in place and make tab to bolt to floor. Fit and tack weld in place. Drill hole in floor and mount. Mount floor panel to determine column hole had to move a little to outside for header clearance. Make piece to fill hole offset, weld and grind. File fit column hole in floor panel. | 8 | ||
| 11/17/08 | Fab electrical panel mount. Drill and weld bungs to mount. Remove paint from firewall to weld, then weld in place. Install radiator and rods. Install left front fender. | 3 | ||
| 11/18/08 | (2 guys) Finish welding battery box and grind nice, primer, repair a small crack on both front fenders, grind, fill sand and recoat. Mount front fenders, running boards, headlight bar, etc. Mount brake calipers, etc. Pull floor panel again and file pedal holes. Final install floor. Sort out all parts to mount on car. Remove rear stuff and mount spare tire carrier and stuff again. Grill shell, etc. | 8 | Tom Deposit & Brake Hose | $125 |
| 11/24/08 | (2 guys) Mount hood panels on car and hood hold downs. Mount rear frame horn covers and spare tire carrier and bumper brackets on rear of car. Remove hood panels and grill shell. Remove radiator to mount new radiator fan (electric) had to trim fan should to fit radiator nice. Drill and mount. Remount radiator and grill shell. Clean up car to assemble mount rods and hood panels. Grind castings and mushrooms off front bumper bolts for rear bumper. Bolt rear bumper on car. Same things to front bumper, bolts, etc. Mount bumper and splash apron. Remove rear bumper brackets and heat rod hot and bend in vise. On and off both sides until fit straight, even and on binding. Hand doors and mount steering column, mount battery and tray. | 8 | ||
| 11/25/08 | Adjust steering column measure and cut steering shaft lines down and inch shorter, not needed and looks cleaner. Measure and cut double D shaft between U-Joints and mount. | 2 | ||
| 11/26/08 | Heat and bend front bumper brackets until everything fit perfect. Prep and spray can all six window regulators, already they were stripped previously. Locate and clean hardware. Tap and die threads clean. Lube and install all regulators. Mount front bumper. Install tail lights, cowl lights, mirrors, handles, etc. | 7 | ||
| 12/02/08 | Pull rear wheels and brakes. Switch sides of wheel cylinders so we can put brake lines on front side of rear end. | 1 | ||
| 12/03/08 | Grind down the head of socket bolt. Weld bolt to rear end housing to mount flex line t-fitting to housing. Mount wheels, then put car on car lift for Tom | 1.5 | ||
| 12/04/08 | Spend some time going over project with Robert and Roy details, parts to order, game plan, etc. Remove gas tank, bumper, etc. To figure gas pick up. | 3 | ||
| 12/05/08 | Remove steering column. Remove old bot from original column drop. Cut down new bolt to fit old drop. Clean threads make piece to bolt column to floor to bolt on to column instead of welding bracket. | 2 | ||
| 02/23/09 | (2 guys) Install floor panel and mark holes for clutch and brake master cylinder access. Remove seat and middle floor panel. Remove E Brake and front floor panel cut access holes in both panels. Take panels in and out several times while trimming. Mount panels and seat back in car. Remove driver's side hood side panel, heat shrink front lower panel that was previously repaired so hood aligns with grill shell. Make plate covers for master cylinder access holds. Drill holes and weld threaded bungs to back side of panels. Grind plugs on grill shell sides for old headlight wire holes. Lower hold 2 1/2 for dropped headlight bar. Sand grill shell and skim coat. | 8 | ||
| 03/17/09 | LED lights for dash panel | 0 | Led lights for dash panel | $ 20.00 |
| 03/30/09 | Put car on lift. Tighten line on clutch cylinder and fill with fluid. Bleed clutch system. Go buy special bolt for longer push rod. Cut and grind to size. Attach spring and test clutch start to mock up E brake design | 3.5 | ||
| 03/31/09 | Measure and order new drive shaft. Drive to Garden Grove and drop off new yolk for drive shaft. | 1 | ||
| 04/07/09 | Drive Shaft and Running Board parts-Drive Shaft $230 - Running Boards $300 | 0 | Total Parts | $ 530.00 |
| 06/29/09 | Sand lower left hood panel where I heat shrunk earlier | 1 | ||
| 06/30/09 | Skim coat left lower hood panel. Block with 40 grit. Glaze coat front and back. Sand both sides and primer pick up pan hard rod kit. | 3 | Front Pan Stainless hard rod kit | $ 75.00 |
| 11/10/09 | (2 guys) Take fenders and running b
Title
Mileage
Location
Engine
T/M
Year
111,111,111
Riverside, California, United States
—
—
1932
999999
Junction City, Kansas, United States
4 cyl
Manual
1931
34730
Augusta, Missouri, United States
Flathead V8
Manual
1937
124,957
Crested Butte, Colorado, United States
283 chevy
—
1948
|